 My raku kiln and reduction can
 My raku kiln and reduction can
Before the summer of 1995, I had no experience whatsoever of raku-firing and had never seen it done. I had no idea how to make a raku glaze, what clay to use, or how to build a suitable kiln. I had not even seen any real-life raku pots. The only books I had which mentioned the subject were a second-hand copy of the Reader's Digest book of 'Crafts & Hobbies'and 'The Potter's Manual' by Kenneth Clark. I also had about 50 hard firebricks and an old pizza oven shelf. So I went out into the backyard and built a strange-looking little wood-fired kiln into which I placed 2 previously bisqued pots coated with a 'copper penny' glaze from the Reader's Digest book. All day long I stoked that kiln with every available piece of wood. For over six hours I watched my pot slowly heat up, but not enough - the glaze never reached melting-point. By mid-afternoon I could find no more wood, and I had to go and cook dinner rather than my pathetic pot.
I decided that my design for a wood-firing raku kiln was totally inefficient.
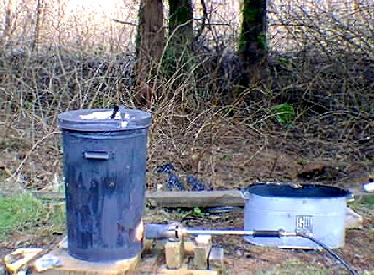
I visited our local Public Library which has a very limited quantity of books on pottery. But I did find a 1976 edition of 'Building Kilns with Space Age Materials' meaning ceramic fibre and garbage cans. I immediately ordered an 8' X 2' piece of fibre blanket and a Tiger Torch 'weedburner' with hose and regulator. I wanted to build a kiln that was small enough to be easily moved and fired by me alone. I decided to use the 24" high galvanized garbage can which was already standing in my workshop. I cut a 5" diameter hole in the lid and another one the same size low down on the side of the can. This was to be the burner port, the one in the lid would be the flue. First time around I coated the can with sodium silicate and glued the 24" ceramic fibre blanket into place; later, when I renewed the fibre, I used homemade kanthal wire pins to keep it in place. I lined the lid of the can and broke off one side of the centre handle, twisting it back to form a longer handle which I could easily grasp to remove the lid when firing. I placed three 4" posts on the base of the kiln, which was also lined, and put a triangular-shaped piece of firebrick in the centre space to act as a flame disperser. I laid a 10" circular kilnshelf on top of the posts. This simple raku kiln took just one morning to build. Although it can only fire fairly small pieces - maximum diameter 12", maximum height 18" - it is quite economical and I have had as may as 13 firings from a 20lb propane tank.
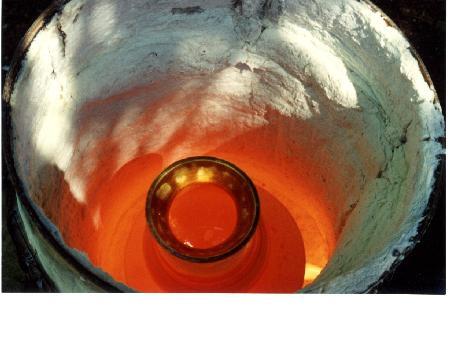 This
picture shows the kiln with the lid off. The pot inside is ready
to be lifted out with long-handled tongs and put into a covered
metal container filled with dry moss, leaves, sawdust, newspaper
or whatever takes your fancy. More often than not, I do not use a
container, but simply dig a hole in the ground and cover it with
a garbage can lid. However, for my kaleidoscope tubes, which have to be well-separated so as not to stick together, I now use a galvanized container with a tight-fitting lid. I line it with a couple of sheets of newsprint and roll up glossy magazines or flyers to use as separating walls between each kaleidoscope body. I generally raku these four at a time.
This
picture shows the kiln with the lid off. The pot inside is ready
to be lifted out with long-handled tongs and put into a covered
metal container filled with dry moss, leaves, sawdust, newspaper
or whatever takes your fancy. More often than not, I do not use a
container, but simply dig a hole in the ground and cover it with
a garbage can lid. However, for my kaleidoscope tubes, which have to be well-separated so as not to stick together, I now use a galvanized container with a tight-fitting lid. I line it with a couple of sheets of newsprint and roll up glossy magazines or flyers to use as separating walls between each kaleidoscope body. I generally raku these four at a time.
 This
is a raku-fired porcelain bowl, 7" diameter, wheel-thrown,
perforated freehand while leather-hard and bisqued to about
1120ºC
This
is a raku-fired porcelain bowl, 7" diameter, wheel-thrown,
perforated freehand while leather-hard and bisqued to about
1120ºC
